Desk Chair Update

>> Thursday, August 27, 2009

Wow, it's almost been 2 weeks since I posted last. Sorry, I guess a week of posting was not enough to get me back in the groove... try, try again!

You may remember I mentioned here that I wanted to recover my desk chair. This wouldn't really be considered trash to treasure, since it was really trash before. What I started out with was our blue cheapest-chair-they-sell-at-Office-Depot office chair. I forgot to take a before picture, so found one on OfficeDepot.com.


Mine was a little more worn and a lot less shiny than this one by the time I did this project! The only real problem with our chair was the fact that it was blue, and nothing in my house except my son's room is blue, so it was just a little out of place.

The first thing I did was take the chair apart and remove the staples. This was harder than I expected. There were a LOT of staples for such a small piece of furniture, and they were in there good! Once I got those out I realized I needed to hit up Hobby Lobby for my first ever can of spray adhesive. This is an important step. At least for my particular chair, since the cushions have a bit of a curve to them and if I just pulled the material tight it wouldn't stay in the curve without a little help. So I used the spray adhesive to stick some extra batting on the back, and to stick the fabric to the batting.


Once you've got it all stuck on, it's time to turn it over and staple!


Lastly, you just have to re-assemble your chair, and viola!


I was kind of afraid that stripe would be a little too crazy looking, and perhaps it would have looked better if I had done the whole chair out of the green loveseat fabric, but you know what? I like the stripe! I think it gives it a little character. And my husband likes it too, which is always good.

I'm linking this post to DIY Day at A Soft Place to Land. There are always tons of cool posts there, so go check them out!

DIY Day @ ASPTL

Read more...

Friday Faves

>> Thursday, August 13, 2009

I found several goodies this week!

First off, I'll start with a couple of blogs I stumbled across that I LOVE.

U Create

The first is U Create. Or Ucreate. I'm not sure if there's a space or not, but either way, this is a really fun blog! Lots and lots and lots of project inspiration, craft ideas, etc. She features her favorite ideas from a ton of different blogs, so it's like finding the best of the best projects, all in one place. LOVE IT. Here's a link to her post about felt food tutorials. Yummy!

My other new favorite is A Penny Saved. I honestly think I read almost every post she has written when I found her blog. I just couldn't stop; she has such good stuff on there! She's lived in and fixed up a few different houses in the last few years, and she does it all inexpensively! That's my kind of girl! This post about making roman shades out of mini blinds is one of my favorites!

Another blog I found this week is Cluck Cluck Sew. I didn't look through the entire site, but I did spend a while looking at the "My Finished Quilts" link.... Ahhhh...I am inspired. Seriously. After looking at this blog I've decided I want to make twin sized quilts for each of my kids for their 2nd birthdays (for moving up to big kid beds!). Not to mention baby blankets! I was also really interested in the quilts because my BFF is coming to visit in a few weeks and I think we're going to start a quilt that's she's making for her soon-to-be-fiance's birthday. We may do something similar to this:

Go check this quilt and all of her others out!

Here are some more of my favorites this week:

Clothespin frame @ A Thousand Words. How clever! You could do this as a recipe card holder in the kitchen! Love.

Felt mustache @ Little Birdie Secrets. This is an old post, but I found it again this week, and thought it was super fun!

Felt food Flickr Group
, because apperently I'm on a felt jag this week!

Read more...

Thirteen dollar renter's mantle

>> Wednesday, August 12, 2009

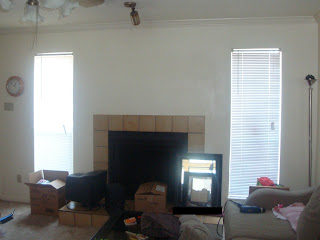
We moved into our new apartment two weeks ago today. It's got some really nice features like crown molding and a wood-burning fireplace in the living room.

The only negative in the living room was that our fireplace didn't have a mantle...it was just a little bare. Well, kind of a lot bare. Here's the before picture:

Pardon the mess...this is the day of or day after moving in.

I knew as soon as we walked into our apartment for the first time that I wanted to put a shelf above the fireplace, as a mantle.

I was so lucky to have my mom and my sister here to help me the first few days I after I moved in. They did all kinds of unpacking, and helping me hang pictures and whatnot. Thanks for the help!

We also did a little shopping at Hobby Lobby, and found the perfect brackets to hang a shelf with! Before choosing these we considered two other options, including scroll-y wrought iron, and fancy looking resin fleur de lis type thingies. I liked all of them, but thought the chunky wooden ones were more my style. They were in the window treatment section, and were 30% off, making them $4 apiece!

{Sorry, I took a close up of the bracket, but blogger won't let me upload it for some reason. I'll try again later}

We bought a 1x8 for $5 at Home Depot, and my mom routed the edge to make it look a little nicer than just a plain board. We painted all 3 pieces with black paint I already had, and hung the brackets and shelf flush with the tile surround.

So the 2 brackets cost $8 together, plus the $5 board, equals a shnazzy $13 mantle!

Here's the after:

I think it turned out loverly, don't you? All I need now are some candles for those (one dollar each!) thrift store candle sticks!

Check out everyone else's awesome DIY projects at DIY Day at A Soft Place to Land!

Read more...

Searching, searching...

>> Tuesday, August 11, 2009

I use a Google reader to keep track of all of the design/craft/decor etc. blogs that I read everyday. I recently made a discovery that other Google reader users have known about since day 1. I'm going to share it anyway, on the off chance that someone else is as clueless as me :)

You can SEARCH for specific topics/keywords on your Google reader! Hello, helpful! I'm pretty sure I've spent a while on more than one occasion scrolling and scrolling down lists of past posts looking for a particular post I'd seen days, weeks, or months before and wanted to find again.

Um, yeah. You know that search box, at the top your reader. You can USE IT! Haha... maybe I'm just a dummy, but my life got so much easier when I realized this! Just tonight I searched for a post about making bandana baby dresses that I saw a few months ago, and found it in about 10 seconds.

And while I'm on the topic of searching, have you ever heard of this?

Search & Win

I love Swagbucks. I've only been doing it for a little while, but basically it is a way to earn "swagbucks" that can be redeemed for prizes like gift cards. And the best part is you earn swagbucks by doing internet searches... Yes. That means free stuff for doing nothing we don't already do.

What's really handy is that you can make the search box at the top of your internet browser a Swagbucks search box, so you don't have to even do anything extra! Sweet.

Anyway, when you refer your friends, you earn swagbucks whenever they do! Cool, eh? Anywho, just click on the button above and we can start earning free stuff together!

Read more...

Table painting advice

>> Monday, August 10, 2009

This is our little table and chairs. Pardon the mess and the poor photography. The mess I can explain. We found a great, cute apartment, that has so many things that we love about it. Especially the things our last apartment was lacking: dishwasher, washer and dryer, 3 big walk in closets, and almost twice the amount of space!

Maybe you could call us inexperienced, or even dumb, but we decided we'd be okay to go ahead and sign up for the apartment without seeing our actual unit. Between schedules of the apartment people (putting in new carpet, yay!) and us going on vacation, we weren't able to see it, but we'd seen another unit and the complex earlier on and really liked it, so....

Unfortunately, we ended up in an apartment that apparently had reeeeally dirty people living in it before. Even our super sweet neighbors (thank goodness for good neighbors!) described them as "trashy". What this boils down to is our apartment had bugs in it when we moved in. Yeah. I'm still disgusted and a bit angry when I think about it. And I still haven't unpacked anything in my kitchen. I'm still a little iffy on whether I want to put anything in there just yet.

Anyway, that's the explanation of why we've got a lovely plastic shelf full of dishes and food in our dining room, and cups stacked all over the table.

So, back to the table. I bought this table planning on painting the bottom of it black. Not so into forrest green. The wood on top is pretty, but I kind of prefer a lighter finish than this is. I've also thought about painting the bottom a creamy white and refinishing the top lighter. I recently saw a blog post on one of my friend's blogs where she painted her entire table black, and I also really liked that! Oh what to do, what to do!

Please give me your opinion!! Leave a comment telling me which option you prefer. Pretty pretty please, please leave me a comment, I really need some advice, because I'd like to do this project soon! Here are the choices:

1. Bottom painted black. Chairs left as is.

2. Bottom painted black. Chairs painted black.

3. Options 1 or 2, plus top refinished in a lighter stain.

4. Entire table painted black, including chairs.

5. Bottom painted creamy white, chairs as is.

6. Bottom painted creamy white, chairs paited creamy white.

7. Options 5 or 6, plus top refinished in a lighter stain.

I know, there are a lot of choices! This is why I need your help! I really appreciate any comments or thoughts you have on the topic (even if it's really short, a la "#3" and that's it)! THANKS!

Read more...

So long, Saved By The Bell high chair!

>> Sunday, August 9, 2009

So, right about the time that my bitty boy was old enough to need a high chair, one of my old neighbors called me up and asked if I wanted their old one, since they had gotten a booster-style seat instead.

Heck yes! I LOVE FREE STUFF! Thanks neighbor! We were so grateful to get this high chair for free, and I really do like it; it works great!

But, let's just say it didn't exactly go with the decor. And never would, unless I decided to move to the set of Saved By The Bell.

See what I mean? Like I said, wonderful chair, so grateful to have it, it just needed a little bit of love! I couldn't resist using a before picture with my adorable little pea-covered boy in it! Feel free to tell me that he's the cutest baby you've ever seen. I'll readily agree with you!

So shortly after I got the high chair, I found a little remnant of neutral vinyl (like the kind you make a table cloth out of...) at JoAnn for a couple of dollars. I can't remember how much it cost exactly, except that it was cheap. It's been several months since I bought it, but this weekend I finally got around to recovering my Saved By The Bell high chair!

I was so excited to get it done (before Bitty needed to eat lunch in his chair :) that I forgot to take pictures until I was more than halfway done. But here's what I did:

1. Cut the old vinyl off of the seat, and trace around the foam onto the backside of the new fabric. (You can see the green pen marks where I traced mine in one of the pictures.) Cut out around the traced shape, leaving some space for a seam allowance.

2. Sew together your front and back pieces, leaving the bottom open, so you can stuff the cushion into it.


At this point I wasn't sure what I should do...Should I hand stitch it closed? Somehow finagle sewing it shut with my sewing machine? Then Bitty woke up from his nap, and wanted lunch, so I needed to finish it quickly (and yes, I was also just lazy :), so...

3. Hot glue the opening shut.

I did it sort of present-style, folding in the part from the front, so that it would be nice and smooth in all the right places on the front, and then folded over the back pieces so it would look finished, and glued that down as well.


This is essentially what it looked like when it was finished. This picture was actually taken before I glued it, so it actually looked better than this, because I made sure the fabric was pulled nice and tight and smooth.

4. Screw the cushion back onto the high chair, and feed your baby lunch!

TaDa! Don't you think it's quite an improvement?! It did end up that my remnant was only enough to cover this top cushion, so I'm actually going to have to go back to the store and find some vinyl to cover the seat cushion with. Oh well! I think it's great so far!

P.S. Do you just LOVE my vertical blinds?! Hahaha...I didn't think so. I'm planning a cornice board and curtains to cover that up, so be sure to watch for that post. It'll probably be a couple of weeks or so before that happens, but I should have a few other fun projects to post in the meantime, so keep checking back!


Check Metamorphosis Monday (button above) at Between Naps on the Porch, Trash to Treasure Tuesday at Reinvented and DIY Day at A Soft Place to Land!

Read more...

Friday Faves

>> Thursday, August 6, 2009

Hello?

Does anyone still read this blog... It's been neglected, poor thing.

I guess that's what happens when you move halfway across the country, go on vacation, find an apartment, move into the apartment, have less-than-desirable issues to deal with in said apartment, etc., etc...

Anywho, I'm going to try to pick the blogging back up! I'll hopefully have some interesting things to post about, with all the projects that happen when you move to a new apartment!

But of course that means I can't spend ALL my time blogging, since I'll need time to actually DO the projects. So, I've decided to start up a new weekly post called "Friday Faves" where I feature some of my favorite blog posts of projects I've seen out in blogland during the week! Hopefully this will help me to be a little more regular at posting, without spending all of my time writing elaborate posts!

Here are some of my Faves this week:


Button wall art @ A Fine House. SO cute, huh?


Grand granola @ New Every Morning. I'm definitely trying this recipe! YUM!


Pleated kitchen towels @ Ducks in a Row. How cute is that?! She's got a tutorial on how to do it n the post. How fun would it be to have towels that actually matched your decor? ; )


Reupholstering an office chair @ The Porch Swing. I'm so doing this. Soon. I even realized today that I already have fabric I can use to recover my chair! Sa-weet!

Read more...

  © Blogger template Simple n' Sweet by Ourblogtemplates.com 2009

Back to TOP