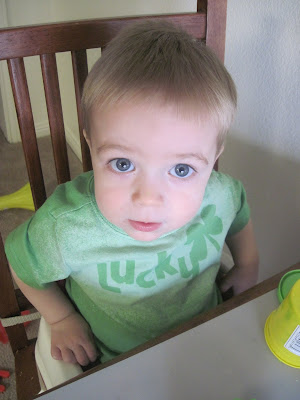
This is my lucky shirt!
>> Wednesday, March 10, 2010
A couple of weeks ago I was shopping at Walmart and saw these green t-shirts for $2 each, and I thought that for $2 I could make a St. Patrick's day shirt! I'm usually too cheap to buy a holiday shirt that's only going to to get worn a couple of times, but even I could handle $2!
So I picked up 3 and had my sister and sister-in-law come over so we could make shirts for our little boys. I knew I wanted to do one of the bleach stencil shirts, so we used this tutorial as a guide.
Here's how to do it:
Step 1: Cut out your letters, shapes, whatever you want to put on your shirt. We printed them off the computer onto cardstock. Figure out how you want to arrange them. This is how I did mine:
Step 2: Use spray adhesive to stick the letters onto your shirt. Mix some water and bleach in a spray bottle. I think we used about a 3:1 ratio (water:bleach). Spray it over the the part of the shirt where your letters are. Anywhere that you want bleached.
Note: Don't forget to put something inside the shirt so the bleach doesn't soak through to the back. We just put a plastic grocery sack inside.
Step 3: Once you see the bleach starting to work, rinse it out in running water. We used some dish soap too, since it was handy, then threw all of the shirts in the washer when they were all finished. We also peeled the letters off as we rinsed it in the sink.
Steps 4, 5, & 6: Wash, dry, and wear!
We were thinking of maybe doing Easter ones with brown T-shirts and using the shape of a chocolate bunny for the stencil. How cute would it be if you used a scallop punch on your stencil to make it look like the chocolate bunny had a bite out of it!?


9 comments:
I love it! Can't wait to go get a green shirt to try it - I'm thinking of doing just a clover outline...i dunno how to explain it but anyways - i'll post on my blog if I do it! thanks for the cute tutorial!
i did the same thing...they turn out cute, don't they...except my shirt shrunk a little, but for one day, i guess it will be fine!
Absolutely Love this! I am featuring it at somedaycrafts.blogspot.com
I love it! I am going to feature it on my blog!
That is really cool. I think I'm going to try it with my little guy tomorrow. Just need to get a shirt and spray.
Too cute...and the shirt is too! :)
This is the coolest idea. I don't know much about the spray adhesive. Can you tell me more about how to do this and what kind to use?
so stinkin cute and the shirt too.
thanks for the tutorial and for being real with the dishes in the sink!
Elizabeth! Thanks for the comment on my blog. I am glad you liked the monsters, I bet your little guy would love them (I can't believe he is close to two!). I can across this blog a long time ago and forgot to put it in my google reader, man I missed on a lot of good stuff! But now I have it in there so I will defiantly be looking at all your great stuff!
ps. I might be asking for some advice with this whole craft blog thing.. as it is still new to me!
Post a Comment